Getting crisp, clear high-frequency audio from your car stereo starts with properly connecting your tweeters. If you’re working with the Dixon DNTS20, a few missteps during wiring can kill your sound quality or damage the drivers entirely.
The Dixon DNTS20 is a surface-mount or flush-mount tweeter that connects using two wires: positive (+) and negative (−). It typically connects in parallel with your front door speakers or through a crossover network. Match polarity correctly, ensure impedance compatibility with your amplifier or head unit, and use a capacitor or crossover to filter low frequencies before they reach the tweeter.
What the Dixon DNTS20 Actually Is
The Dixon DNTS20 is a compact car audio tweeter designed for high-frequency sound reproduction, typically covering frequencies from around 4 kHz and up. It’s commonly sold as part of a component speaker system or as a standalone upgrade for factory speaker setups.
Like most aftermarket tweeters, it operates on a 4-ohm nominal impedance and handles modest power levels suited to both head-unit output and amplified systems. The DNTS20 uses a silk or synthetic dome diaphragm that responds well to high-frequency signals but can be damaged quickly by unfiltered bass.
Tools and Materials You’ll Need
Before starting, gather everything so the job doesn’t stall halfway through:
- Wire stripper and crimper
- Electrical tape or heat-shrink tubing
- Small flathead and Phillips screwdrivers
- Panel removal tool (trim pry tool)
- Inline capacitor (if not using a full crossover)
- Crossover network (optional but recommended)
- 16–18 AWG speaker wire
- Mounting bracket or surface mount adapter (if included)
- Multimeter (optional, for polarity verification)
A drill may be needed if you’re flush-mounting the tweeter in a pillar or custom location.
Understanding the Wiring Terminals
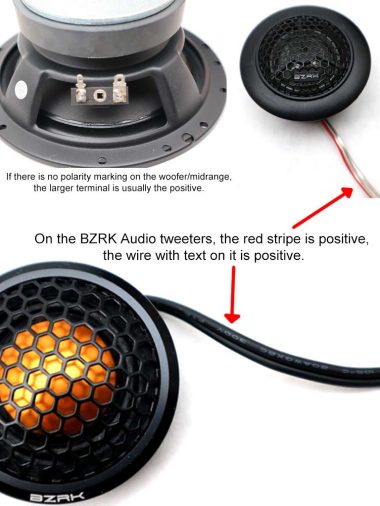
The Dixon DNTS20 has two connection terminals: positive and negative. These are typically color-coded or labeled directly on the tweeter housing. The positive terminal is usually marked with a red dot, a “+” symbol, or a longer lead wire.
Getting polarity wrong won’t always cause immediate damage, but it will throw off phase alignment between your tweeters and midbass drivers. In practice, reversed polarity produces a thin, hollow sound with poor stereo imaging — something many owners mistake for a bad tweeter.
Always verify polarity before finalizing connections. A 1.5V AA battery briefly touched to the terminals will tell you: the tweeter should produce a faint click or small forward cone movement when positive battery is connected to positive terminal.
Connection Method 1: Direct Parallel Wiring to Door Speakers
This is the simplest method and works when you’re not using an external amplifier. The tweeter connects directly across the same terminals as your existing door speaker.
Step-by-step:
- Disconnect the vehicle’s negative battery terminal before starting any electrical work.
- Remove the door panel or A-pillar cover to access your existing speaker wiring.
- Locate the positive and negative wires feeding your door speaker.
- Run a new wire from the door speaker terminals to your chosen tweeter location.
- Connect the positive tweeter wire to the positive speaker terminal and negative to negative.
- Install an inline capacitor on the positive wire to block low frequencies. A 4.7 µF capacitor is a common starting point for 4-ohm tweeters.
- Mount the tweeter, secure all connections with heat-shrink tubing, and reassemble the panel.
- Reconnect the battery and test.
Why the capacitor matters: Without filtering, bass frequencies will pass through the tweeter voice coil and cause distortion or permanent damage over time. A capacitor acts as a simple high-pass filter that protects the driver.
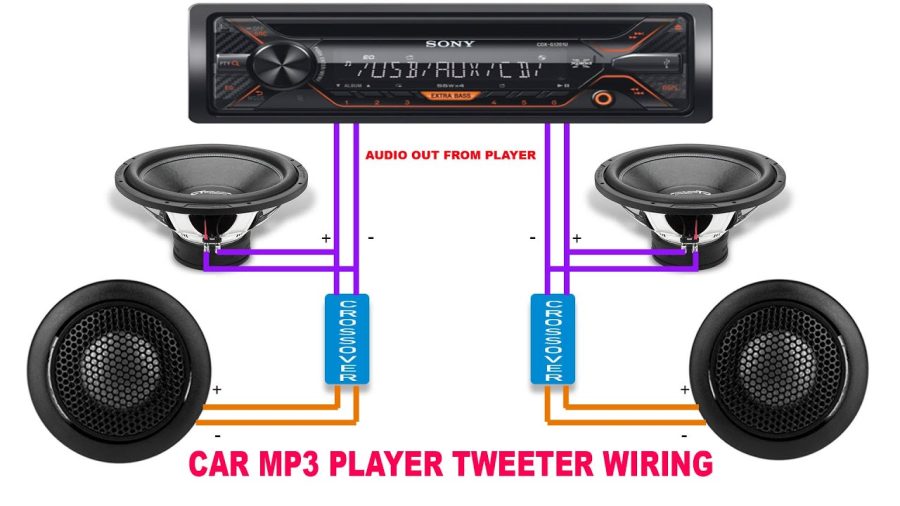
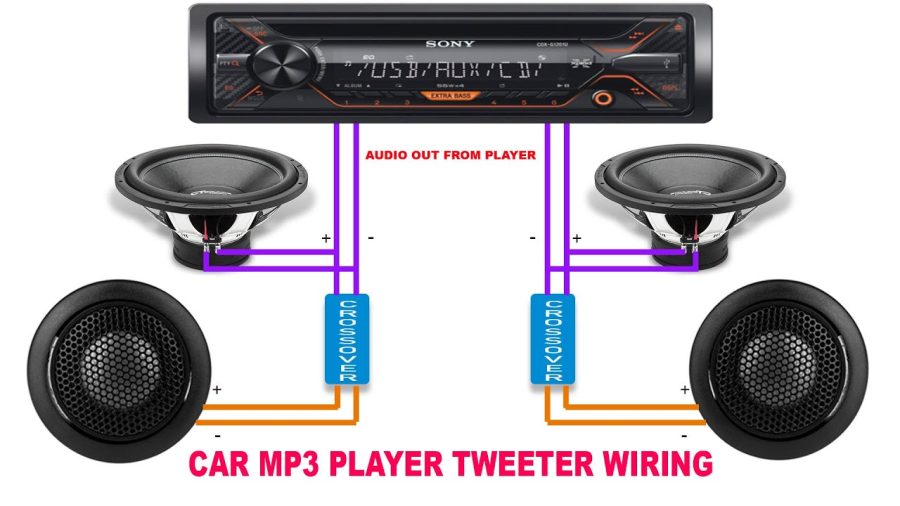
Connection Method 2: Through a Passive Crossover Network
If the Dixon DNTS20 was purchased as part of a component speaker set, it likely came with a passive crossover. This is the preferred setup for clean, accurate sound.
The crossover network splits the audio signal: low frequencies go to the woofer, high frequencies go to the tweeter. This produces cleaner separation and better speaker protection than a simple capacitor alone.
Wiring sequence:
- Disconnect the negative battery terminal.
- Mount the crossover in a location protected from heat and moisture — typically behind the door panel or under the dash.
- Run speaker wire from your head unit or amplifier to the crossover’s input terminals (labeled IN+ and IN−).
- Connect the crossover’s tweeter output (HF+ and HF−) to the Dixon DNTS20.
- Connect the crossover’s woofer output (LF+ and LF−) to your midbass driver.
- Verify polarity throughout the entire chain.
- Mount tweeters, reassemble panels, reconnect battery, and test.
The crossover eliminates guesswork around capacitor sizing and provides better frequency tuning overall.
Connection Method 3: Amplifier-Driven Setup
Running the DNTS20 through a dedicated amplifier channel delivers the cleanest power and allows you to control tweeter output level separately. Many 4-channel amps include high-pass filter settings specifically for tweeters.
In this setup, set the amplifier’s high-pass crossover to around 4,000–5,000 Hz (4–5 kHz) at 12 dB/octave or higher slope. This protects the tweeter and removes midrange duties it was never designed to handle.
Keep tweeter gain slightly lower than your midbass drivers. Many owners overlook this and end up with harsh, fatiguing highs — a common complaint that’s simply a gain calibration problem, not a component flaw.
Mounting Location Options
Tweeter placement significantly affects how the system sounds inside the cabin. Common locations include:
- A-pillar pods — Near ear level, ideal for soundstage imaging
- Dash corners — Good high-frequency dispersion across the cabin
- Door sail panels — Factory-looking install with decent directional control
- Surface-mount on the dash or pillar — Easiest installation using the included bracket
The DNTS20 typically ships with a surface-mount swivel bracket and a flush-mount adapter ring. Aim tweeters slightly toward the listening position but not directly at ear level, which can cause listening fatigue on long drives.
Impedance and Power Handling Considerations
The Dixon DNTS20 is typically rated at 4 ohms nominal impedance. When wiring it in parallel with a door speaker also rated at 4 ohms, the combined load drops to 2 ohms — which may stress a factory head unit.
If your head unit specifies a minimum 4-ohm load, use a crossover or capacitor connection rather than direct parallel wiring. An external amplifier handles 2-ohm loads more comfortably and is the better long-term choice for parallel wiring configurations.
Always check your head unit’s minimum impedance rating in the owner’s manual before completing the parallel wiring connection.
Common Wiring Mistakes to Avoid
Several problems show up repeatedly in tweeter installations:
- Reversed polarity — Causes phase cancellation and weak stereo imaging
- No high-pass filtering — Exposes the tweeter to damaging low-frequency content
- Loose crimp connections — Causes intermittent cutting in and out, especially over road bumps
- Incorrect impedance load — Can cause head unit clipping or shutdown
- Tweeter aimed directly at the listener — Creates harshness at highway speeds
Connections made with simple wire nuts tend to work loose from vibration over time. Always use proper crimp connectors or soldered joints with heat-shrink protection.
Testing the Installation Before Closing Panels
Before reassembling door panels and pillar covers, do a quick audio test with the panels loosely set in place:
- Reconnect the negative battery terminal.
- Play a familiar audio track at moderate volume — acoustic guitar or vocals work well for tweeter evaluation.
- Listen for clear, clean high-frequency output without harshness or distortion.
- Check both channels separately to confirm equal output.
- Run a hand near the tweeter to confirm air movement, which indicates the driver is working.
If one tweeter is noticeably quieter or silent, recheck polarity and connection integrity before assuming the driver is faulty.
FAQ
Can I connect the Dixon DNTS20 directly to a factory head unit without an amplifier?
Yes, but always use an inline capacitor or passive crossover to block low frequencies. Factory head units typically output 14–20 watts RMS per channel, which is within safe range for the DNTS20. Running without filtering risks voice coil damage from low-frequency content that the tweeter’s small driver cannot handle efficiently.
What size capacitor should I use with the Dixon DNTS20 for a simple inline crossover?
A 4.7 µF non-polarized capacitor is a practical starting point for a 4-ohm tweeter, creating a rough high-pass filter around 8 kHz. For a lower crossover point around 4–5 kHz, a 10 µF capacitor is more appropriate. The exact value depends on your desired crossover frequency and tweeter impedance.
Why does my Dixon DNTS20 sound harsh or too bright after installation?
Harshness usually means the tweeter is receiving too much power or is aimed directly at the listener. Reduce the tweeter gain on your amplifier or head unit’s fader, and try angling the tweeter slightly off-axis. A crossover slope steeper than 6 dB/octave also helps by rolling off the highs more aggressively.
Can I wire the DNTS20 in parallel with a 6×9 speaker instead of a component door speaker?
Yes, the wiring method is the same regardless of the paired speaker size. However, always verify the combined impedance load won’t drop below your head unit’s minimum rating. A passive crossover connected between the signal source and the speakers remains the cleanest and safest approach in any configuration.
Does the Dixon DNTS20 need a separate amplifier channel?
Not necessarily. It can operate from a head unit channel through a crossover or capacitor. A dedicated amplifier channel does improve dynamics and control, especially in systems playing at higher volumes. If you already run an amplifier for your door speakers, many 4-channel amps allow the rear channels to be bridged or used separately for tweeters.
What’s the difference between surface mounting and flush mounting the DNTS20?
Surface mounting uses the swivel bracket to attach the tweeter to a flat surface like the dash corner or A-pillar, requiring no cutting. Flush mounting requires drilling or cutting a circular hole sized to the tweeter’s outside diameter, creating a cleaner factory-style appearance. The included flush-mount ring finishes the opening neatly.
How do I know if the Dixon DNTS20 is wired out of phase with my door speakers?
Play a mono audio signal (a centered vocal track works well) and listen for thin, hollow sound with the stereo image appearing outside the speakers rather than between them. Swap the positive and negative connections on one tweeter only, then retest. Phase alignment is correct when the sound becomes full and focused between the speakers.
Proper wiring of the Dixon DNTS20 comes down to three non-negotiables: correct polarity, appropriate high-pass filtering, and compatible impedance loading. Nail those three points and the tweeter will perform cleanly and reliably. Whether you use a simple capacitor, a passive crossover, or a dedicated amplifier channel, the installation process is manageable for a careful DIY installer with basic hand tools and patience.