Upgrading the factory head unit in a 2010 Ford Explorer to an Android-based media player opens up navigation, Bluetooth audio, backup camera support, and wireless connectivity that the stock system simply can’t offer. The installation is DIY-friendly with the right tools and a clear process.
Installing a YMT Android car media player in a 2010 Ford Explorer involves removing the factory radio using trim panel tools, disconnecting the OEM wiring harness, connecting a Metra or similar Ford-compatible wiring harness adapter to the new unit, mounting the YMT head unit in the factory dash opening, and routing any auxiliary cables (GPS antenna, microphone, backup camera). Most 2010 Explorer models use a standard single or double-DIN dash pocket depending on trim level.
What You Need Before Starting
Gather everything before pulling apart the dash. Stopping mid-installation to track down a tool wastes time and increases the risk of leaving something partially disconnected.
Tools and materials:
- Plastic pry tools / trim removal kit
- Phillips and flat-head screwdrivers
- Panel clip remover
- Wire stripper and crimping tool
- Electrical tape or heat shrink tubing
- Multimeter (optional but useful for verifying power wires)
- Zip ties for cable management
Parts and accessories:
- YMT Android head unit (confirm dash size compatibility — more on this below)
- Ford-compatible wiring harness adapter (commonly Metra 70-5521 or equivalent for 2010 Explorer)
- Dash kit / mounting bezel if required for your trim
- GPS antenna extension (usually included with the YMT unit)
- External microphone for hands-free calls
- Backup camera (if not already included)
Disconnect the negative terminal of the battery before touching any wiring. This prevents accidental short circuits and protects both the head unit and the vehicle’s electrical system.
Checking Dash Size and Trim Compatibility
The 2010 Ford Explorer uses a double-DIN dash opening in most configurations, which fits standard 7-inch or larger YMT Android units. However, the exact trim around the radio pocket can vary between the XLS, XLT, Eddie Bauer, and Limited trims.
Some 2010 Explorers came with the factory Navigation/Sony system, which has a slightly different wiring connector than the base audio setup. If your Explorer has the factory nav, you may need a specific amplifier bypass harness in addition to the standard wiring adapter, because the factory amp often controls the speakers separately from the head unit.
Verify whether your Explorer has a factory amplifier by checking whether the speaker wires connect directly to the radio or route to an amp module. A factory amp setup without a proper bypass harness will result in no audio or very low volume after installation.
Removing the Factory Radio
Step 1 — Disconnect the battery
Remove the negative terminal and wait at least 10 minutes before working near the dash. This avoids triggering airbag sensors and protects the vehicle’s electronics.
Step 2 — Remove the center console trim panel
The 2010 Explorer’s center dash trim typically snaps into place with plastic clips. Starting from a lower corner, gently insert a plastic pry tool and work around the perimeter. Apply steady, even pressure rather than forcing any single clip — broken clips are one of the most common unnecessary costs in this job.
Step 3 — Remove the radio mounting screws
Once the trim panel is off, four screws (typically Phillips) secure the factory head unit to the dash cage. Remove these and carefully slide the unit forward.
Step 4 — Disconnect the factory connectors
Press the release tab on each connector before pulling — forcing a connector sideways can break the locking tab. You’ll typically find one or two main wiring harness plugs and a smaller antenna connector. Label them with tape if you’re concerned about reinstallation later.
Wiring the YMT Unit
This is the most critical step. Incorrect wiring causes blown fuses, no audio, or unit damage.
Step 5 — Connect the wiring harness adapter
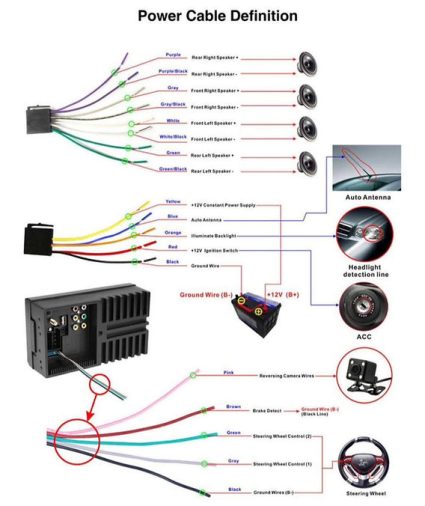
Plug the Ford-compatible harness adapter into the factory vehicle-side connector. The adapter’s pre-labeled wires then connect to the YMT unit’s wiring pigtail. Match wire functions — not just colors — using the adapter’s included diagram and the YMT unit’s manual.
- Common wire functions to confirm:
- Battery/constant 12V — keeps memory and settings when the car is off
- Accessory/switched 12V — powers the unit when the ignition is on
- Ground — typically solid black
- Illumination — dims the display with headlights
- Speaker outputs (front left/right, rear left/right, positive and negative for each)
Twist each matched pair together, crimp with a butt connector, and cover with heat shrink. Avoid using bare wire-nut connections inside the dash — vibration will loosen them over time.
Step 6 — Connect the antenna, GPS, and microphone
The factory FM antenna connects via an ISO or DIN adapter (usually included or inexpensive separately). Route the GPS antenna to the dash surface or windshield — the antenna needs a clear view of the sky. Mount the microphone near the driver’s visor for clear hands-free audio pickup.
Mounting the YMT Unit and Routing the Backup Camera
- Step 7 — Test before final mounting
- Reconnect the battery and power on the YMT unit before pushing it into the dash. Verify:
- The unit boots and displays correctly
- AM/FM radio receives signal
- Bluetooth pairs with a phone
- Navigation GPS acquires a signal
- All speaker channels produce audio
Testing at this stage saves significant time compared to discovering a wiring issue after everything is buttoned up.
Step 8 — Route the backup camera wire
If adding a backup camera, the video cable typically runs from the rear of the vehicle through the interior to the head unit’s camera input. The camera trigger wire connects to the reverse light circuit so the camera activates automatically when the vehicle is shifted into reverse. Accessing the reverse light wires at the tailgate or tail lamp assembly is usually the cleanest approach.
Step 9 — Seat the unit and reinstall trim
Slide the YMT unit into the dash opening. If the bezel or surround doesn’t align cleanly, a dash kit adapter may be required. Secure any mounting screws, then snap the trim panels back into place — work from the center outward to seat each clip properly.
Common Installation Problems and How to Fix Them
No audio after installation
The most likely cause is a factory amplifier that isn’t being triggered. Confirm whether your 2010 Explorer has an amplified audio system and use a compatible amp bypass or integration harness.
Unit powers on but display is dim or unresponsive
Check the illumination wire connection. If the display stays at low brightness regardless of headlight status, the illumination wire may be incorrectly connected or grounded.
GPS signal is weak or absent
The GPS antenna placement matters. Position it flat on the top of the dash near the windshield with the receiver face up. Tinted windshields with metallic coatings can block GPS signals — external antenna routing may be needed.
Backup camera has no image in reverse
Confirm the trigger wire is connected to the correct reverse light circuit and shows 12V when the transmission is in reverse. Verify the camera input on the head unit is selected in the unit’s settings menu.
Radio reception is poor
The factory antenna may need an FM antenna adapter to match the YMT unit’s antenna input. Many Ford vehicles use a Motorola-style antenna connector, and a simple adapter resolves this.
Settings to Configure After Installation
Once the unit is mounted and operational, several settings improve daily usability:
- Set the time zone and GPS region in navigation settings
- Adjust speaker fade and balance to match your Explorer’s interior
- Enable auto-brightness so the display adjusts with ambient light
- Pair your phone via Bluetooth and test call audio through the microphone
- Set the backup camera trigger to automatic if not already configured
Many YMT units run Android and allow app installation through the Google Play Store. Updating the firmware after installation is also worth doing — manufacturers frequently release updates that improve stability and compatibility.
FAQ
Will a YMT Android head unit fit a 2010 Ford Explorer without modification?
Most 2010 Ford Explorers have a double-DIN dash opening that accommodates standard YMT units. However, if your Explorer has a factory navigation system or Sony audio package, you may need an amplifier bypass harness in addition to the standard wiring adapter. Measure the dash opening and confirm the unit’s dimensions before purchasing.
Do I need a wiring harness adapter for a 2010 Ford Explorer head unit replacement?
Yes. A Ford-compatible wiring harness adapter is required to connect the YMT unit to the vehicle’s factory plug without cutting the original wiring. Metra and similar brands make these adapters specifically for Ford vehicles. Using an adapter preserves the factory wiring and makes future removal much cleaner.
What is the factory amp bypass harness needed for in a 2010 Explorer with Sony audio?
The factory Sony system in some 2010 Explorers routes audio through an external amplifier. The head unit sends a low-level signal to that amp, which then powers the speakers. A standard head unit replacement bypasses this amp, resulting in silence. An amp bypass or integration harness restores the signal path and typically includes a built-in sound processor to maintain audio quality.
Can I install a backup camera with the YMT Android player on a 2010 Ford Explorer?
Yes. The YMT unit includes a backup camera input, and the camera trigger activates automatically when the vehicle is shifted into reverse. Run the video cable from the rear camera through the interior, and connect the trigger wire to the reverse light circuit at the tail lamp assembly. Most 2010 Explorers don’t have a factory backup camera, so this is a meaningful safety upgrade.
How long does it take to install a YMT Android head unit in a 2010 Ford Explorer?
For someone with basic DIY experience, the installation typically takes 2–4 hours. First-timers should expect to be closer to 4 hours when accounting for careful trim removal, wire matching, and testing. The complexity increases if the vehicle has a factory amplified audio system, which requires additional wiring steps.
Will installing an aftermarket head unit affect the 2010 Ford Explorer’s factory TPMS or other warning systems?
The head unit replacement itself does not affect the TPMS, which operates independently through the instrument cluster. However, if any connectors to the factory audio system also carry data signals (common in some Ford configurations), using an improper adapter could interfere with those signals. Always use a vehicle-specific harness adapter designed for the 2010 Explorer’s wiring configuration.
Can I retain Sirius XM satellite radio after installing a YMT Android unit in a 2010 Explorer?
The YMT Android platform supports streaming apps like SiriusXM’s own app via a paired smartphone data connection, but it does not natively decode the factory SiriusXM tuner signal. If you want to keep satellite radio, you would need an add-on SiriusXM tuner that connects to the YMT unit via USB or auxiliary input.
A successful YMT installation on a 2010 Ford Explorer comes down to three things: using the correct wiring harness adapter, checking for a factory amplifier before connecting speakers, and testing everything before closing up the dash. Take your time with the trim panels — broken clips are avoidable and costly. Once it’s running, you’ll have a fully capable Android media system in a platform that was never designed for it.