Getting clean, powerful sound from your car’s audio system starts with a properly wired amplifier. If you’re running a 4-channel amp with a built-in or external crossover, the wiring sequence and signal routing make a significant difference in how your system actually sounds.
To connect a 4-channel car amplifier with a crossover, you’ll run power from the battery, ground to the vehicle chassis, a remote turn-on wire from the head unit, and RCA signal cables from the head unit to the amp. Then you configure the amp’s built-in crossover settings — low-pass for subwoofers and high-pass for speakers — before connecting your speaker outputs to the appropriate channels.
What a Crossover Actually Does in This Setup
A crossover filters audio frequencies so each speaker receives only the range it’s designed to handle. High-frequency content damages subwoofers over time, while low-frequency rumble muddies tweeters and midrange speakers.
Most 4-channel amplifiers include switchable built-in crossover filters. You’ll typically find a low-pass filter (LPF), a high-pass filter (HPF), and sometimes a bandpass option. When bridging two channels to power a subwoofer, you’d set those channels to LPF mode. For front and rear door speakers, HPF mode prevents bass distortion at higher volumes.
Tools and Materials You’ll Need
Before touching any wires, gather everything. Stopping mid-install to hunt down tools is how mistakes happen.
- 4-channel car amplifier
- Amplifier wiring kit (typically includes power wire, ground wire, remote wire, and inline fuse holder)
- RCA cables (4-channel or stereo pair, depending on your head unit outputs)
- Speaker wire (minimum 16-gauge for door speakers, 12–14 gauge for subwoofers)
- Wire stripper and crimping tool
- Multimeter
- Electrical tape and heat shrink tubing
- Ring terminals and butt connectors
- Fuse puller
- Screwdrivers (Phillips and flathead)
- Fish tape or wire pulling rod for routing
The quality of your RCA cables matters more than most people expect. Cheap cables pick up alternator whine and introduce noise into the signal path. A well-shielded pair like the KnuKonceptz Karma Kable Ultra Flex 2-Channel RCA Cable handles this cleanly.
Safety Before You Start
Disconnect the negative terminal of your battery before running any wiring. This single step prevents accidental short circuits that can blow fuses, damage your head unit, or start a fire.
Never run your power wire through the vehicle’s interior without a fuse installed within 18 inches of the battery. The inline fuse on amplifier wiring kits exists for this reason — it protects the entire run if a short occurs.
Keep power wires and signal cables (RCA, speaker wires) separated on opposite sides of the vehicle where possible. Routing them parallel to each other over long distances is the most common cause of ground loop noise.
Step-by-Step Wiring Sequence
1. Mount the Amplifier First
Choose a location with adequate airflow — most amps vent heat from their sides or bottom. Common mounting spots include under a front seat, in the trunk, or on a custom amp rack. Secure it before running any wires.
2. Run the Power Wire
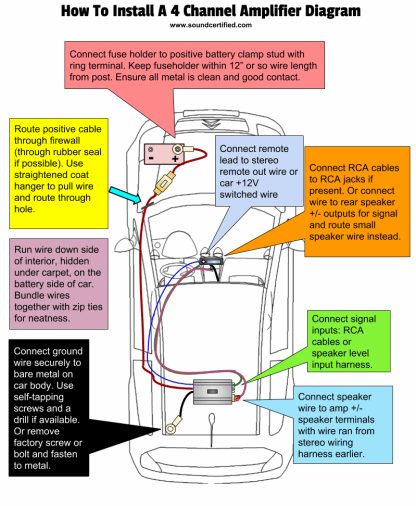
Route a fused power cable from the battery’s positive terminal through the firewall using an existing grommet or a clean drilled hole with a rubber grommet installed. Run this wire along the vehicle’s rocker panels or under carpet to your amp location. Keep it away from the signal wires on the opposite side of the car.
Connect the inline fuse holder within 18 inches of the battery. Size the fuse to match your amplifier’s total rated current draw — most 4-channel amps in the 400–800W range use a 60A–100A fuse, but check your amp’s manual for the correct value.
3. Ground the Amplifier
Ground is the most overlooked part of any car audio install. A poor ground causes noise, thermal shutdowns, and clipping. Run a ground wire from the amp’s ground terminal to a bare metal chassis point within 18 inches of the amp. Sand away any paint or coating to expose raw metal. A ring terminal bolted directly to a factory chassis grounding point works best.
The ground wire should be the same gauge as your power wire. Undersizing it is a common mistake.
4. Run the Remote Turn-On Wire
This thin wire (typically 18-gauge blue wire in wiring kits) connects from your head unit’s remote output — labeled “REM” or “Remote” or “Amp Turn-On” — to the amp’s remote terminal. When the head unit powers on, it sends 12V through this wire to turn the amp on and off automatically.
If your head unit lacks a dedicated remote output, the antenna lead or a switched 12V source from the fuse box can substitute, though a proper remote output is preferred.
5. Connect the RCA Cables
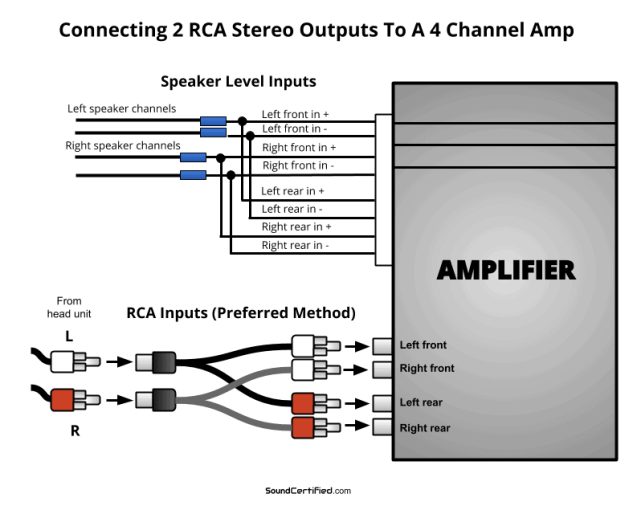
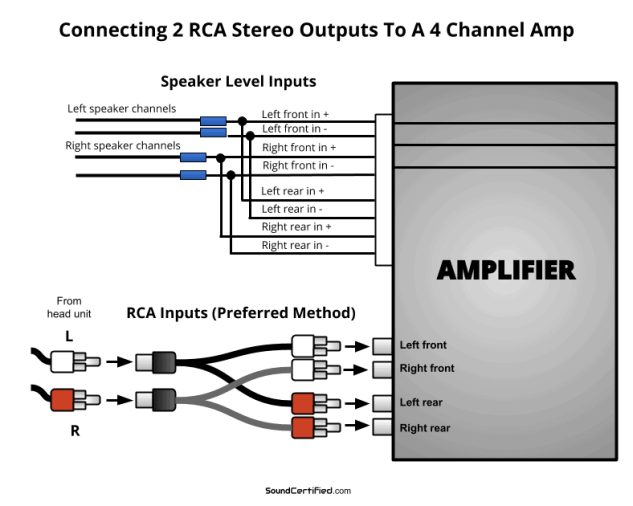
Plug your RCA cables into the head unit’s preamp outputs. If your head unit has both front and rear preamp outputs, use all four for a true 4-channel setup. Route them along the opposite side of the vehicle from the power wire.
Plug the other ends into your amplifier’s RCA inputs. On most 4-channel amps, the front inputs feed channels 1 and 2, and the rear inputs feed channels 3 and 4.
If your head unit only has a single stereo preamp output, you can use a Y-adapter to split the signal, though this reduces your ability to set independent volume levels per zone.
6. Configure the Crossover Settings on the Amplifier
This is where most beginners skip critical steps. Before connecting speakers, set the crossover filters correctly.
- For front/rear door speakers (channels 1–4 in full-range mode):
- Set the crossover switch to HPF (high-pass filter)
- Set the HPF frequency between 80 Hz and 120 Hz depending on your speaker size and enclosure
- This blocks bass frequencies the speakers can’t reproduce cleanly
- For a bridged subwoofer setup (channels 3 and 4 bridged):
- Set those channels to LPF (low-pass filter)
- Set the LPF frequency between 80 Hz and 120 Hz, matching your HPF crossover point
- The subsonic filter (if available) should be set around 25–35 Hz for ported enclosures, higher for sealed
The crossover point where HPF and LPF meet is called the crossover frequency. Keeping both filters set to the same frequency creates a smooth handoff between speakers and subwoofer without gaps or overlap.
7. Connect Speaker Outputs
Run speaker wire from the amp’s output terminals to each speaker. Most 4-channel amps label these as:
- Channel 1: Front Left
- Channel 2: Front Right
- Channel 3: Rear Left
- Channel 4: Rear Right
Match positive to positive and negative to negative at both the amp and speaker. Reversing polarity on one speaker causes phase cancellation — bass frequencies cancel out and the soundstage collapses.
For a bridged subwoofer, connect the positive terminal of the sub to the positive output of one channel and the negative terminal of the sub to the negative output of the adjacent channel (typically channels 3 and 4). Consult your amp’s manual for the exact bridging diagram — it varies by model.
8. Reconnect the Battery and Power On
Reconnect the negative battery terminal. Power the head unit on and check that the amp’s power indicator turns on. Start with the gain control turned all the way down.
Play a test tone or music and slowly increase the gain until the sound becomes slightly distorted, then back it off slightly. This sets the gain correctly without adding clipping distortion to your speakers.
Crossover Filter Frequency Reference
| Speaker Type | Recommended Filter | Typical Frequency Range |
|---|---|---|
| 6.5″ door speakers | High-Pass (HPF) | 80–100 Hz |
| 5.25″ speakers | High-Pass (HPF) | 100–125 Hz |
| Tweeters (standalone) | High-Pass (HPF) | 3,000–5,000 Hz |
| 8″ subwoofer | Low-Pass (LPF) | 80–100 Hz |
| 10–12″ subwoofer | Low-Pass (LPF) | 60–100 Hz |
These are general starting points. Fine-tune by ear in your actual vehicle with music you know well.
Common Wiring Problems and What Causes Them
Amplifier not turning on: Check the remote wire voltage with a multimeter. No voltage means the head unit remote output isn’t wired or activated. Also verify the main fuse hasn’t blown.
Alternator whine through speakers: Usually caused by a poor ground, power and signal cables routed together, or a ground loop through the RCA shield. Try a ground loop isolator like the PAC SNI-1/3.5 Ground Loop Noise Isolator as a temporary fix while you diagnose the root cause.
One channel has no output: Swap RCA cables at the amp input to determine if the issue is the head unit output, the RCA cable, or the amp channel itself.
Amp goes into thermal protection: Insufficient airflow around the amp, impedance too low for the amp’s rated output, or gain set too high causing sustained clipping.
Distortion at high volume: Gain is likely set too high, or the crossover frequency is wrong for the speaker’s capabilities. A mismatched crossover can force a small speaker to reproduce frequencies it physically cannot handle.
When a Separate Outboard Crossover Makes Sense
Built-in amp crossovers work well for straightforward 2-way setups. If you’re building a more complex system with separate tweeters, midrange drivers, and subwoofers — each on their own amp channel — an outboard active crossover gives you more precise control over slopes, frequencies, and timing.
Component crossover networks (passive, wired inline between amp and speaker) work similarly but are less flexible and add some resistance to the signal path.
FAQ
What gauge power wire should I use for a 4-channel amplifier?
Wire gauge depends on amplifier wattage and the distance from battery to amp. For amps drawing up to 50A, 8-gauge is typically sufficient. For higher-output amps drawing 50–100A, use 4-gauge. Always check the amp’s owner manual for the manufacturer’s recommended wire gauge, as undersizing causes voltage drop and heat buildup.
Can I run a subwoofer and door speakers from a single 4-channel amp?
Yes. Bridge channels 3 and 4 together to drive one subwoofer (check your amp’s minimum bridged impedance — typically 4 ohms), and use channels 1 and 2 for front door speakers. Set channels 1 and 2 to HPF and the bridged pair to LPF for correct frequency routing. This is one of the most common 4-channel setups.
What crossover frequency should I set for 6.5-inch door speakers?
For 6.5-inch speakers, a high-pass filter set between 80 Hz and 100 Hz is a practical starting point. This removes bass frequencies the speaker struggles to reproduce cleanly, which reduces distortion at higher volumes and protects the speaker from over-excursion on bass-heavy content.
Why does my amp make a whining noise that changes with engine RPM?
This is alternator whine, caused by electrical noise from the charging system entering the audio signal. The most common causes are an inadequate ground connection, a power or ground wire looped near signal cables, or a ground loop through the RCA cable shielding. Start by checking the amp’s chassis ground connection before trying other fixes.
Do I need an external crossover if my amp already has one built in?
For most car audio setups, the built-in crossover on a quality 4-channel amp is entirely adequate. An external active crossover becomes useful in more advanced multi-amp, multi-driver systems where you need precise independent control over slopes, frequencies, and signal levels that built-in controls can’t provide.
How do I set amp gain correctly without a multimeter or oscilloscope?
Set the head unit volume to about 80% of maximum. Start with the amp gain at minimum and play a moderately loud, bass-heavy track. Slowly increase the gain until you hear the sound begin to distort or harden, then back the gain down slightly until it sounds clean. This isn’t the most precise method, but it’s a reasonable starting point for most installations.
Can I use speaker-level inputs on the amp instead of RCA cables?
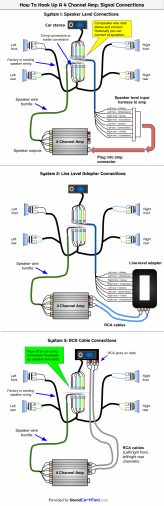
Many 4-channel amps include speaker-level (high-level) inputs designed for vehicles without RCA preamp outputs on the factory head unit. Connect these inputs to the existing speaker wire outputs from your factory radio. While this works, it’s generally better to use RCA preamp outputs when available, as the signal quality is cleaner and less susceptible to noise.
Getting a 4-channel amp installed correctly the first time saves hours of troubleshooting later. The most common failures — noise, distortion, and thermal shutdowns — trace back to poor grounds, misrouted cables, and incorrect crossover settings. Focus on those three areas and the rest of the installation is straightforward.